Kaggle Dogs vs. Cats is a dataset that contains 25000 images of cats and dogs. Images are different sizes, so need them to reprocess. There are 12500 images of dogs and the same number of cats. Cats are labeled by 0 and dogs are labeled by 1. It is a binary classification problem because there are two classes.
| Label | Class name |
|---|---|
| 0 | Cat |
| 1 | Dog |
This tutorial provides an example how to use convolutional neural network (CNN) to classify images of dogs and cats. We will use TensorFlow 2 and TensorFlow Datasets (TFDS).
Using pip package manager, install tensorflow and tensorflow-datasets from the command line.
pip install tensorflowpip install tensorflow-datasetsTFDS provides the ready to use Dogs vs. Cats dataset, which can be loaded by using the tfds.load function. The dataset is downloaded automatically and cached on the filesystem. Dataset contains 23262 images instead of 25000 because there are 1738 corrupted images that were removed. We split the dataset into two sets: 70% of images for training the model and 30% of images for testing the model.
We display a few images to verify that the dataset loaded successfully.
plot.py
import tensorflow_datasets as tfds
import matplotlib.pyplot as plt

classNames = ['cat', 'dog']
split = ['train[:70%]', 'train[70%:]']

trainDataset, testDataset = tfds.load(name='cats_vs_dogs', split=split, as_supervised=True)

i = 0
fig, ax = plt.subplots(1, 8)
for image, label in testDataset.take(8):
    ax[i].axis('off')
    ax[i].set_title(classNames[label])
    ax[i].imshow(image)
    i += 1

plt.show()
The first 8 testing images:

The tfds.load function returns training and testing sets. Each set contains images with associated labels. Images are different sizes, so they are resized to 200x200 pixels. To improve activation functions performance, we apply normalization on each image by dividing each pixel value by 255 to get a range of 0 to 1.
We build a convolutional neural network. It contains a stack of Conv2D and MaxPooling2D layers. The shape of input is [200, 200, 3]. It corresponds to [image_height, image_width, color_channels]. We are solving a binary classification problem, so the last layer has one output and uses a Sigmoid activation function.
To compile the model, we use a binary cross-entropy loss function and Adam optimizer. The metrics parameter is used to report the accuracy of the training.
We use 10 epochs to train the model. It is possible that all images cannot fit into memory, so images are loaded in batches. A single batch contains 32 images. It was defined by using batch method.
By using validation_data parameter, we define the data which will be used to evaluate the loss and accuracy at the end of each epoch. We use the testing set because we don't have a separate validation set.
train.py
import tensorflow as tf
import tensorflow_datasets as tfds
from tensorflow import keras
from matplotlib import pyplot as plt


def preprocess(img, label):
    return tf.image.resize(img, [HEIGHT, WIDTH]) / 255, label


HEIGHT = 200
WIDTH = 200
split = ['train[:70%]', 'train[70%:]']

trainDataset, testDataset = tfds.load(name='cats_vs_dogs', split=split, as_supervised=True)

trainDataset = trainDataset.map(preprocess).batch(32)
testDataset = testDataset.map(preprocess).batch(32)

model = keras.Sequential([
    keras.layers.Conv2D(16, (3, 3), activation='relu', input_shape=(HEIGHT, WIDTH, 3)),
    keras.layers.MaxPooling2D((2, 2)),
    keras.layers.Conv2D(32, (3, 3), activation='relu'),
    keras.layers.MaxPooling2D((2, 2)),
    keras.layers.Conv2D(64, (3, 3), activation='relu'),
    keras.layers.MaxPooling2D((2, 2)),
    keras.layers.Flatten(),
    keras.layers.Dense(512, activation='relu'),
    keras.layers.Dense(1, activation='sigmoid')
])

model.compile(optimizer='adam', loss='binary_crossentropy', metrics=['accuracy'])

trainHistory = model.fit(trainDataset, epochs=10, validation_data=testDataset)

plt.plot(trainHistory.history['accuracy'])
plt.plot(trainHistory.history['val_accuracy'])
plt.ylabel('Accuracy')
plt.xlabel('Epoch')
plt.legend(['Training', 'Validation'])
plt.grid()
plt.show()

(loss, accuracy) = model.evaluate(testDataset)
print(loss)
print(accuracy)

model.save('model.h5')
We display the training history. It shows accuracy on the training and validation sets for each epoch.
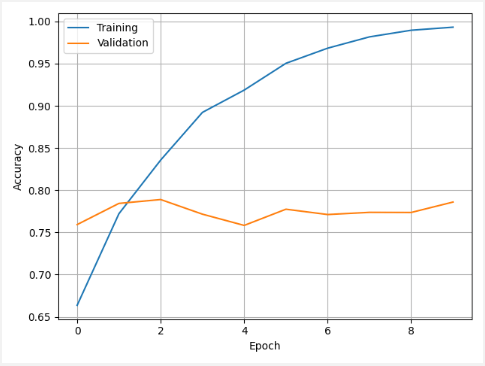
We use a testing set to evaluate the model. In this case, we got an accuracy of 0.7859. In other words, model accuracy is about 79%.
1.2919237613677979
0.7859292030334473
A model was trained, and now we can predict if the given images contain a dog or a cat. We load the model from HDF5 format file. Images are reprocessed like we have done for training. Batch size is 1 because we take a small amount of images for testing.
The model has one output, which value is in the range from 0 to 1. To determine label, we use these conditions:
- If prediction < 0.5 then label = 0 (cat)
- If prediction >= 0.5 then label = 1 (dog)
test.py
import tensorflow as tf
import tensorflow_datasets as tfds
from tensorflow import keras
from matplotlib import pyplot as plt


def preprocess(img, label):
    return tf.image.resize(img, [HEIGHT, WIDTH]) / 255, tf.cast(label, tf.float32)


HEIGHT = 200
WIDTH = 200
classNames = ['cat', 'dog']
split = ['train[:70%]', 'train[70%:]']

trainDataset, testDataset = tfds.load(name='cats_vs_dogs', split=split, as_supervised=True)

testDataset = testDataset.map(preprocess).batch(1)

model = keras.models.load_model('model.h5')

predictions = model.predict(testDataset.take(8))

i = 0
fig, ax = plt.subplots(1, 8)
for image, _ in testDataset.take(8):
    predictedLabel = int(predictions[i] >= 0.5)

    ax[i].axis('off')
    ax[i].set_title(classNames[predictedLabel])
    ax[i].imshow(image[0])
    i += 1

plt.show()
Predictions were made for the first 8 testing images. A model incorrectly predicted class for the fifth image.


Leave a Comment
Cancel reply