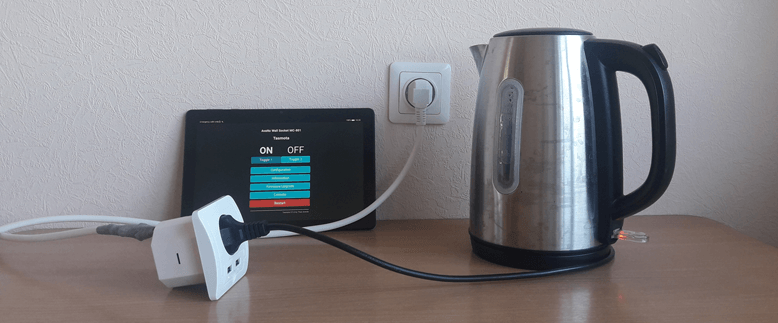
Avatto Wi-Fi wall socket is 16 A wall socket that has two USB ports and integrated ESP8266 Wi-Fi module. This socket is compatible with Tuya Smart mobile application that allows to remotely turn on and off appliances.
Many device vendors uses Tuya firmware and cloud services.Tuya doesn't provide a way to control devices locally without connecting to cloud servers. So I decided to use Tuya-convert tool to flash Tasmota latest firmware to Avatto Wi-Fi wall socket. After it finished, I connected to Tasmota dashboard using a web browser. I started to create device template. I tried to assign the components to the GPIOs to match wall socket. After many attempts, I found which GPIOs are responsible for controlling the socket components. Here is a template:
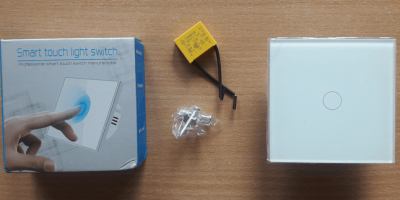
{"NAME":"Avatto Wall Socket MC-801","GPIO":[0,0,0,0,576,32,0,0,0,0,224,0,225,0],"FLAG":0,"BASE":18}The following image shows components of Avatto Wi-Fi wall socket (MC-801 model):

Wall socket can be bought from AliExpress.
The following table presents how components was assigned in the device template to the GPIOs:
| GPIO | Name | Description |
|---|---|---|
| GPIO4 (576) | LedLinki | Link status blue LED (1) that shows the Wi-Fi network state. |
| GPIO5 (32) | Button 1 | Button (2) that allows to turn on and off socket (3). First red LED (5) shows state. |
| GPIO14 (224) | Relay 1 | Relay that turns on and off socket (3). First red LED (5) shows state. |
| GPIO16 (225) | Relay 2 | Relay that turns on and off two USB ports (4). Second red LED (6) shows state. |
Tasmota has commands can be issued using HTTP requests. We can send HTTP GET requests to control relay 1 and 2 to turn on and off socket and USB ports. The following table shows commands:
| Command | Description |
|---|---|
Power0 | Controls state for relay 1 and 2. |
Power1 | Controls state for relay 1. |
Power2 | Controls state for relay 2. |
We can provide one of the following parameters to the command:
| Parameter | Description |
|---|---|
0 or off | Turn off relay. |
1 or on | Turn on relay. |
2 or toggle | If relay is on, switch to off and vice versa. |
If command is used without a parameter then current state is returned.
The following table shows examples of HTTP GET requests using curl command:
| Request | Description |
|---|---|
curl http://<IP_ADDRESS>/cm?cmnd=Power1 | Get current state of relay 1. Response example:{"POWER1":"ON"} |
curl http://<IP_ADDRESS>/cm?cmnd=Power1%20on | Turn on relay 1. |
curl http://<IP_ADDRESS>/cm?cmnd=Power1%20off | Turn off relay 1. |
curl http://<IP_ADDRESS>/cm?cmnd=Power1%20toggle | Toggle state of relay 1. |
IP_ADDRESS- IP address of Avatto Wi-Fi wall socket.- Command
Power1can be replaced withPower2to control relay 2 orPower0to control both relays.
We can send GET requests programmatically. You can read post how to do that using various programming languages.

Leave a Comment
Cancel reply