
Girier Wi-Fi light switch is 10 A switch that has integrated Wi-Fi module. Switch can be installed into the electrical box in the wall and allows to control home lighting remotely.
This tutorial explains how to flash the Tasmota firmware on Girier Wi-Fi light switch via serial connection.
Requirements
| No. | Component | Quantity |
|---|---|---|
| 1. | Girier Wi-Fi light switch | 1 |
| 2. | USB to TTL serial adapter | 1 |
| 3. | Soldering iron | 1 |
| 4. | Wires | 6 |
Light switch can be bought from AliExpress.
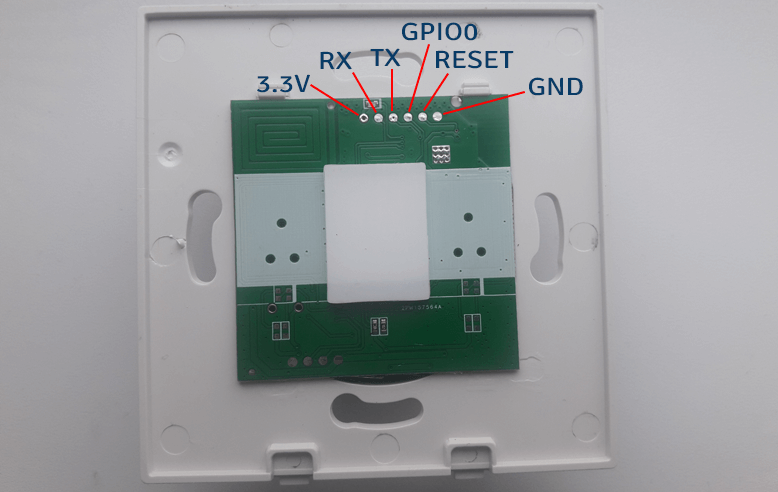
Pins identification
Open the switch and identify the pins.
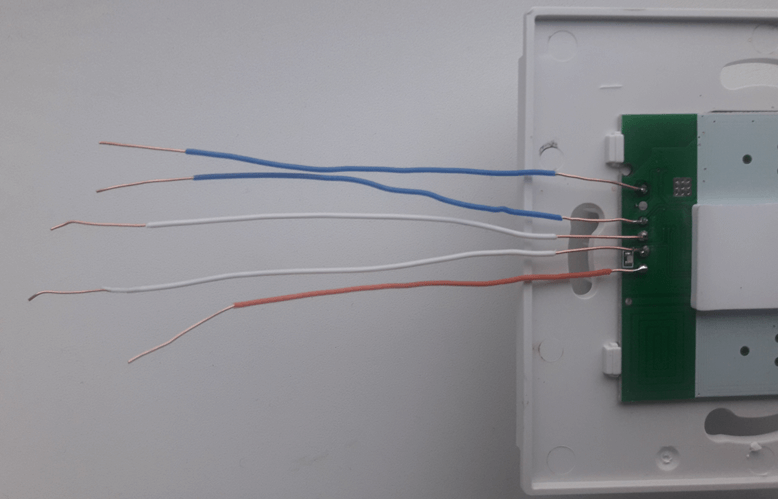
Wires soldering
Solder the wires to 3.3V, RX, TX, GPIO0, and GND pins. RESET pin will be used as well but soldering is not required for this pin.
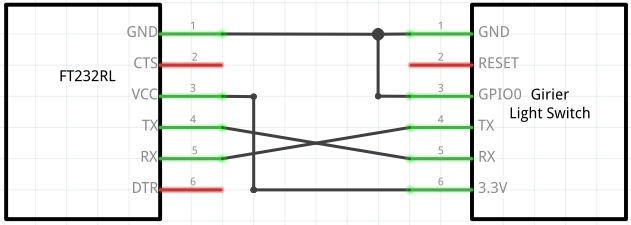
Serial connection
Connect wires from light switch to TTL serial adapter according to the circuit diagram:
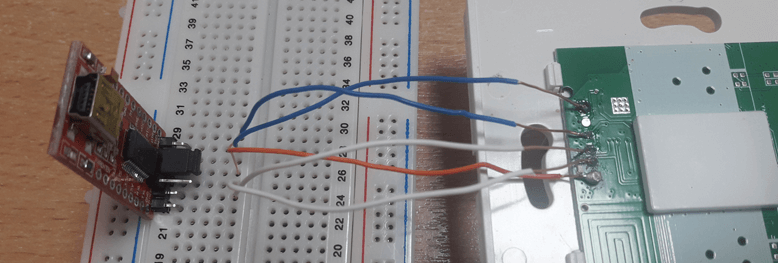
This is how it looks like after connecting wires:
Flash the Tasmota firmware
Download the latest Tasmota firmware from the releases page in GitHub repository:
curl -Lo tasmota.bin https://github.com/arendst/Tasmota/releases/latest/download/tasmota.binConnect the TTL serial adapter to computer via USB. Open the Tasmotizer and choose the serial port. Select the tasmota.bin file and click button "Tasmotize!".
Right after the process has started briefly connect RESET pin to GND using wire. After this step, the board will be recognized and Tasmota firmware will be flashed to the board.
When process is done, disconnect TTL serial adapter from computer and disconnect GPIO0 from GND. Connect TTL serial adapter to computer again. The tasmota_XXXXXX-XXXX wireless access point will appear on the list.
We finished to flash the Tasmota firmware on Girier Wi-Fi light switch. Now you can configure Wi-Fi using Tasmota web interface.
Set template in Tasmota
Follow the following steps to set template in Tasmota:
- Access the Tasmota web interface by using IP address of light switch.
- Navigate to "Configuration" and then "Configure Other".
- Provide the template in "Template" field:
1 gang. LedLink (blue light when light switch is turned off) is enabled:
{"NAME":"Girier Light Switch 1 Gang JR-SEU01","GPIO":[0,544,0,0,0,32,0,0,224,0,0,0,0,0],"FLAG":0,"BASE":18}1 gang. LedLink is disabled:
{"NAME":"Girier Light Switch 1 Gang JR-SEU01","GPIO":[0,0,0,0,0,32,0,0,224,0,0,0,0,0],"FLAG":0,"BASE":18}2 gang. LedLink is enabled:
{"NAME":"Girier Light Switch 2 Gang JR-SEU01","GPIO":[0,544,0,32,33,0,0,0,0,224,225,0,0,0],"FLAG":0,"BASE":18}2 gang. LedLink is disabled:
{"NAME":"Girier Light Switch 2 Gang JR-SEU01","GPIO":[0,0,0,32,33,0,0,0,0,224,225,0,0,0],"FLAG":0,"BASE":18}- Check "Activate" box and click "Save" button.
- Once device rebooted, you will see new title at the top of the page.
Wi-Fi connection issues
If your light switch has Wi-Fi connection issues, probably you have Wi-Fi 6 router. To fix this issue, open the Tasmota console using web interface and execute the following command:
wifi 3This command enables Wi-Fi mode 802.11b/g.
Physical button too slow
You might have issues with response time of physical button. This means when you press the physical button and then there is an annoying delay. It can be solved by running the following command via Tasmota console:
SetOption13 1This option enables only single press action for immediate response.


Leave a Comment
Cancel reply