
Slack is a messaging service that allows to communicate with team members. Slack allows creating channels where a team members can send messages and share files. Incoming Webhooks is one of the ways to send messages from a custom application to a Slack channel.
This tutorial shows how to send a message to a Slack channel using Incoming Webhooks and ESP8266 NodeMCU development board.
Components
| No. | Component | Quantity |
|---|---|---|
| 1. | ESP8266 NodeMCU + Micro USB cable | 1 |
Incoming Webhooks integration
In order to use the Incoming Webhooks, we need to create a Slack app. Follow these steps:
- Sign in to Slack and create an app.
- Provide an app name and choose a workspace to associate with the app. Click "Create App".
- Under the section of "Add features and functionality" click "Incoming Webhooks".
- In the next screen, turn on the switch to activate Incoming Webhooks.
- Then extra options will appear. Click "Add New Webhook to Workspace".
- In the new screen, select a channel and click "Allow". You will be redirected back to Incoming Webhooks settings.
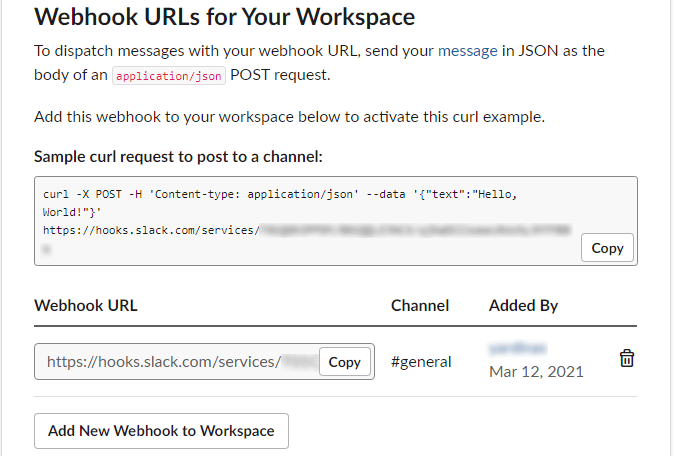
- You can see a Webhook URL which look something like this:
https://hooks.slack.com/services/TXXXXXXXXXX/BXXXXXXXXXX/XXXXXXXXXXXXXXXXXXXXXXXX- Copy a Webhook URL. It will be used to send a message to a channel that selected in the setup. In this case,
generalchannel has been selected.
Get fingerprint of an SSL certificate
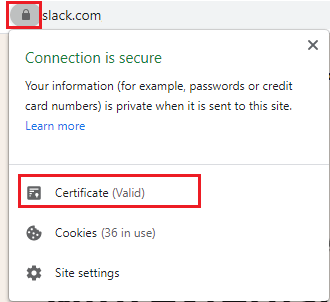
In order to send a GET request using HTTPS protocol from ESP8266 NodeMCU to the server, we need to get the fingerprint of an SSL certificate. If you use Chrome browser, then follow these steps:
- Open a browser and enter the URL address of a Slack website.
- Click on the lock icon in the address bar and choose "Certificate" option.
- In the new window, select the "Details" tab and find "Thumbprint" field in the list. Copy the thumbprint. It will be used in the code.
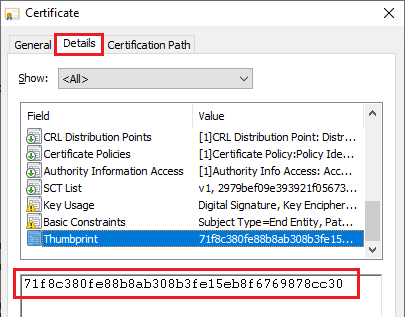
Note: fingerprint should be updated when the certificate expires.
Code
We define constants to store Wi-Fi network SSID and password, a Webhook URL, and fingerprint of an SSL certificate.
In the setup function, serial communication is initialized. We set the station (STA) mode in order to connect to a Wi-Fi network.
In the loop function, we generate the random number from 1 to 100 (inclusive). Messages to a Slack channel are send in a JSON format using POST requests.
#include <ESP8266WiFi.h>
#include <ESP8266HTTPClient.h>

const char *WIFI_SSID = "YOUR WIFI NETWORK NAME";
const char *WIFI_PASSWORD = "YOUR WIFI PASSWORD";

const char *URL = "https://hooks.slack.com/services/XX/XX/XX";
const char *FINGERPRINT = "71f8c380fe88b8ab308b3fe15eb8f6769878cc30";

WiFiClientSecure client;
HTTPClient httpsClient;

void setup()
{
    Serial.begin(9600);

    WiFi.mode(WIFI_STA);

    WiFi.begin(WIFI_SSID, WIFI_PASSWORD);
    while (WiFi.status() != WL_CONNECTED) {
        delay(500);
        Serial.print(".");
    }

    Serial.println("Connected");

    client.setFingerprint(FINGERPRINT);
}

void loop()
{
    int value = random(1, 101);
    String data = "{\"text\":\"" + String(value) + "\"}";

    httpsClient.begin(client, URL);
    httpsClient.addHeader("Content-Type", "application/json");
    httpsClient.POST(data);
    httpsClient.end();

    delay(5000);
}
Testing
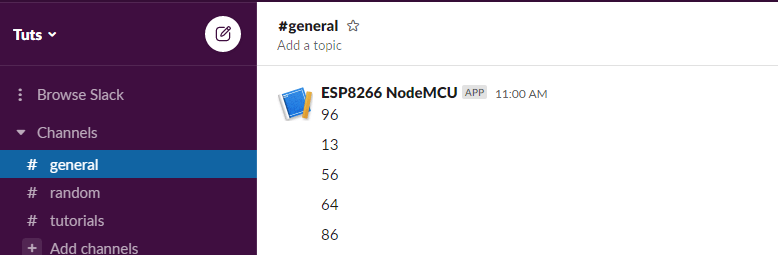
Open a Slack channel to see messages posted by ESP8266 NodeMCU board.
Leave a Comment
Cancel reply