
Darkstat is a network traffic monitoring tool. It captures network traffic and calculates statistics. Darkstat provides web interface to view traffic graphs and reports.
This tutorial demonstrates how to install Darkstat on Raspberry Pi.
Install Darkstat
Connect to Raspberry Pi via SSH. Update the package lists and install Darkstat with commands:
sudo apt update
sudo apt install -y darkstat
We can check Darkstart version as follows:
darkstat --versionNow we need to configure Darkstat. Open the main configuration file:
sudo nano /etc/darkstat/init.cfgSearch START_DARKSTAT option and change value from no to yes. By default, Darkstat listens traffic on eth0 interface. It can be provided using INTERFACE option. Run the following command if you want to get a list of all available network interfaces:
ip addr showThe following options has been changed in the configuration file:
/etc/darkstat/init.cfg
START_DARKSTAT=yes
INTERFACE="-i wlan0"
To apply changes restart Darkstart service:
sudo service darkstat restartWe can check service status as follows:
sudo service darkstat statusWe can stop and start the Darkstat service with commands:
sudo service darkstat stop
sudo service darkstat start
Testing Darkstat
Get IP address of the Raspberry Pi:
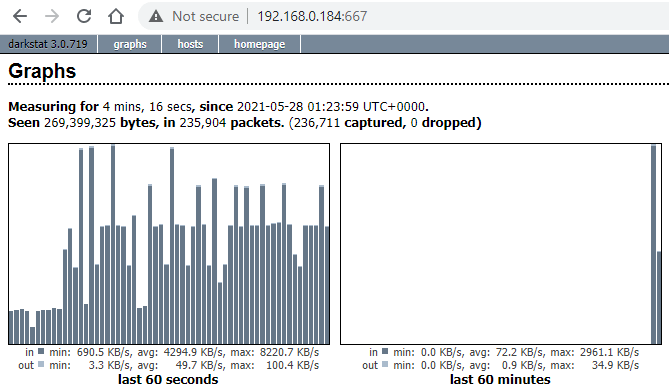
hostname -IBy default, Darkstat listens on port 667.
Open a browser and access a web interface by going to URL http://<IP_ADDRESS>:667, where <IP_ADDRESS> is IP address of Raspberry Pi.
Uninstall Darkstat
If you wish to completely remove Darkstat and related dependencies, execute the following command:
sudo apt purge --autoremove -y darkstatYou can also remove the statistics:
sudo rm -rf /var/lib/darkstat

Leave a Comment
Cancel reply