
The ESP8266 is a chip that has a full TCP/IP protocol stack. The ESP8266 can act as a MQTT client and publish messages to the MQTT broker on specified topic.
This tutorial provides example how to publish message to the MQTT broker using ESP8266 NodeMCU development board.
Components
| No. | Component | Quantity |
|---|---|---|
| 1. | ESP8266 NodeMCU + Micro USB cable | 1 |
| 2. | MQTT broker. For example, Mosquitto running on Raspberry Pi | 1 |
Library
PubSubClient is an MQTT client library that allows to publish messages to a MQTT broker and subscribe to message topics. PubSubClient library can be installed using PlatformIO from the command line.
pio project init --board nodemcuv2
pio lib install "knolleary/PubSubClient"
Project configuration file:
platformio.ini
[env:nodemcuv2]
platform = espressif8266
board = nodemcuv2
framework = arduino
lib_deps = knolleary/PubSubClient@^2.8
Code
We define constants to store Wi-Fi network credentials (SSID and password). There are also constants that stores connection details of the MQTT broker. We need to know the IP address or hostname of MQTT broker, the network port, the username and the corresponding password.
Each client that connects to an MQTT broker should have client ID. The broker uses ID to identify the client. A client will be disconnected if another client connects with the same client ID. So client ID should be unique. We define client ID as a constant.
Messages will be published on the nodemcu/test topic. In order to publish messages to the MQTT broker we create an instance of PubSubClient class.
In the setup function we initialize serial communication and establish connection to a Wi-Fi network. We use setServer method to specify the hostname and the port of the MQTT broker. We do a while loop and check whether the client is connected to the MQTT broker. The connect method is used to connect to the MQTT broker.
In the loop function we generate random number from 1 to 100 (inclusive). A number is converted to a sequence of characters and message is published on the nodemcu/test topic.
src/main.cpp
#include <Arduino.h>
#include <ESP8266WiFi.h>
#include <PubSubClient.h>

const char *WIFI_SSID = "YOUR WIFI NETWORK NAME";
const char *WIFI_PASSWORD = "YOUR WIFI PASSWORD";

const char *MQTT_HOST = "192.168.0.184";
const int MQTT_PORT = 1883;
const char *MQTT_CLIENT_ID = "ESP8266 NodeMCU";
const char *MQTT_USER = "YOUR MQTT USER";
const char *MQTT_PASSWORD = "YOUR MQTT USER PASSWORD";
const char *TOPIC = "nodemcu/test";

WiFiClient client;
PubSubClient mqttClient(client);

void setup()
{
    Serial.begin(9600);

    WiFi.begin(WIFI_SSID, WIFI_PASSWORD);
    while (WiFi.status() != WL_CONNECTED) {
        delay(500);
        Serial.print(".");
    }

    Serial.println("Connected to Wi-Fi");

    mqttClient.setServer(MQTT_HOST, MQTT_PORT);

    while (!client.connected()) {
        if (mqttClient.connect(MQTT_CLIENT_ID, MQTT_USER, MQTT_PASSWORD )) {
            Serial.println("Connected to MQTT broker");
        } else {
            delay(500);
            Serial.print(".");
        }
    }
}

void loop()
{
    int value = random(1, 101);
    mqttClient.publish(TOPIC, String(value).c_str());

    delay(1000);
}
Build project
Run the following command to build project and upload program to the ESP8266 NodeMCU:
pio run --target uploadTesting
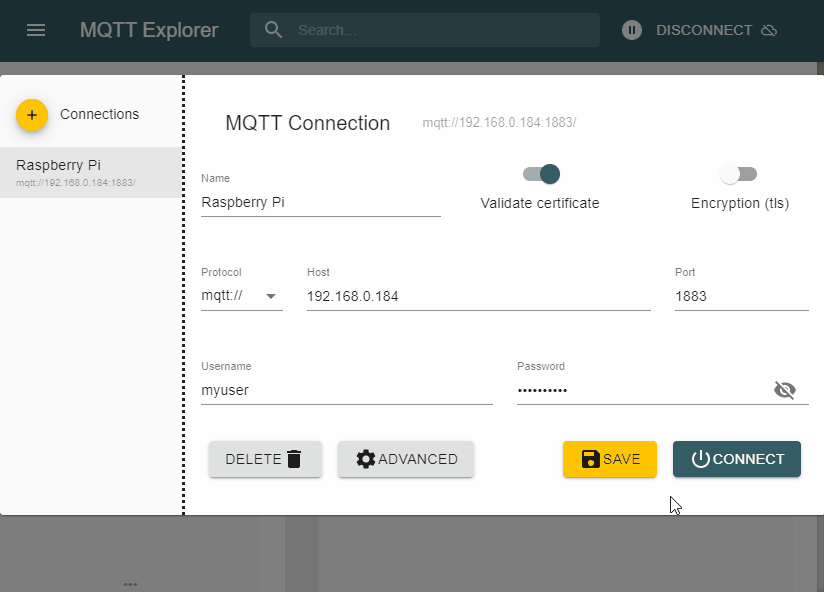
We can test using MQTT Explorer. It subscribes to a nodemcu/test topic and visualizes received messages.

Leave a Comment
Cancel reply