In multimedia and computer vision, there's a frequent need to combine image processing capabilities with a user-friendly interface. When creating a Qt application, especially one dealing with webcam feeds and real-time video processing using OpenCV, it's often necessary to show multiple frames side by side. This approach is incredibly useful for purposes like comparing raw and processed frames, observing the impact of various algorithms, or providing comprehensive results to users. This tutorial shows how to display webcam frames side by side in Qt 6 application using OpenCV.
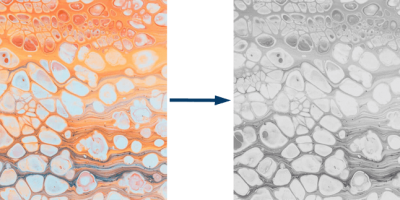
The following code initializes a Qt application and sets up a window with two labels to display webcam frames side by side. It uses the OpenCV library to capture video frames from the default webcam, adjusts the frame size, and checks if the webcam is successfully opened.
In a loop that runs at 30 frames per second, it consistently captures frames from the webcam, converts one to grayscale, and converts both frames into the QImage for display in QLabel widgets.
#include <QApplication>
#include <QLabel>
#include <QImage>
#include <QHBoxLayout>
#include <QTimer>
#include <opencv2/opencv.hpp>

int main(int argc, char *argv[])
{
    QApplication app(argc, argv);

    QSize size(640, 480);

    cv::VideoCapture cap(0);
    cap.set(cv::CAP_PROP_FRAME_WIDTH, size.width());
    cap.set(cv::CAP_PROP_FRAME_HEIGHT, size.height());
    if (!cap.isOpened()) {
        std::cout << "Cannot open webcam" << std::endl;

        return -1;
    }

    auto *window = new QWidget();
    QLabel label1(window);
    QLabel label2(window);
    label1.setFixedSize(size);
    label2.setFixedSize(size);

    cv::Mat frame;
    cv::Mat frameGray;
    QTimer timer;
    QObject::connect(&timer, &QTimer::timeout, [&]() {
        cap >> frame;
        cvtColor(frame, frameGray, cv::COLOR_BGR2GRAY);

        QImage qimg(frame.data, frame.cols, frame.rows, frame.step, QImage::Format_BGR888);
        QImage qimgGray(frameGray.data, frameGray.cols, frameGray.rows, frameGray.step, QImage::Format_Grayscale8);

        label1.setPixmap(QPixmap::fromImage(qimg));
        label2.setPixmap(QPixmap::fromImage(qimgGray));
    });

    timer.start(1000 / 30); // 30 fps

    QHBoxLayout layout(window);
    layout.addWidget(&label1);
    layout.addWidget(&label2);
    window->setLayout(&layout);
    window->show();

    return QApplication::exec();
}
Leave a Comment
Cancel reply