When developing a Qt application that involves image processing using OpenCV, it's common to need to display multiple images side by side. It can be useful for showing a preprocessed image alongside its original version, allowing users to visually compare the effects of various image processing techniques. The ability to showcase both the input and output images in a clear and comprehensible manner is essential for debugging, testing, and presenting results to end-users. This tutorial explains how to display images side by side in Qt 6 application using OpenCV.
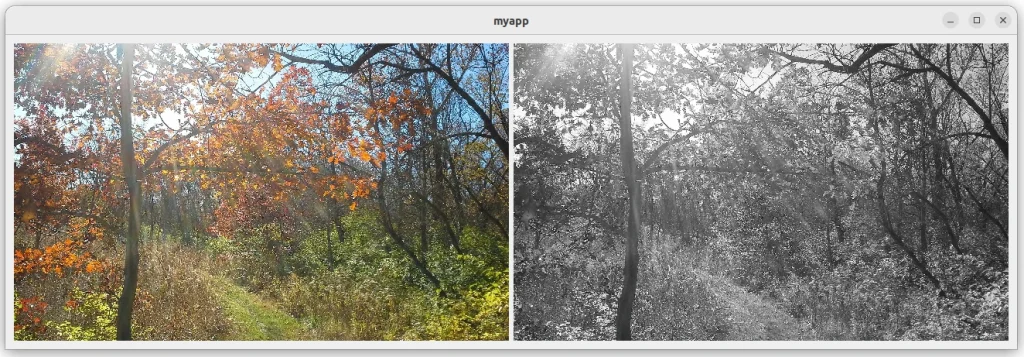
This example uses the Qt library to create a simple GUI window with two labels to display the color and grayscale images side by side. The images are loaded using OpenCV and converted to Qt QImage format for display in QLabel widgets.
#include <QApplication>
#include <QLabel>
#include <QImage>
#include <QHBoxLayout>
#include <opencv2/opencv.hpp>

int main(int argc, char *argv[])
{
    QApplication a(argc, argv);

    cv::Mat img = cv::imread("test.jpg");
    cv::Mat imgGray;
    cvtColor(img, imgGray, cv::COLOR_BGR2GRAY);

    QImage qimg(img.data, img.cols, img.rows, img.step, QImage::Format_BGR888);
    QImage qimgGray(imgGray.data, imgGray.cols, imgGray.rows, imgGray.step, QImage::Format_Grayscale8);

    auto *window = new QWidget();

    QLabel label1(window);
    QLabel label2(window);
    label1.setPixmap(QPixmap::fromImage(qimg).scaledToWidth(640));
    label2.setPixmap(QPixmap::fromImage(qimgGray).scaledToWidth(640));

    QHBoxLayout layout(window);
    layout.addWidget(&label1);
    layout.addWidget(&label2);
    window->setLayout(&layout);
    window->show();

    return QApplication::exec();
}
Here's how the application looks:


Leave a Comment
Cancel reply