Qt, the powerful cross-platform application framework, allows developers to create graphical user interfaces for their applications. While Qt provides a set of default styles, sometimes you might want to add a touch of modernity and elegance to your user interface. One way to achieve this is by incorporating Bootstrap's style into your Qt buttons. This tutorial explains how to make Qt 6 buttons to look in Bootstrap style.
The provided code aims to style Qt buttons to resemble the Bootstrap framework visual style. The embedded CSS-like styling defines common properties such as border-radius, padding, font size, and text color for all button instances. Additionally, it introduces distinct styles for buttons with the class primary and secondary. The primary buttons have a blue background, while secondary buttons have a gray background.
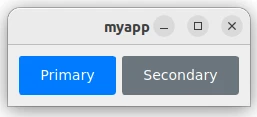
The main function creates a Qt application, sets the defined style sheet, creates a window with a horizontal layout, and adds two button instances with the classes primary and secondary to the layout. The resulting GUI will showcase Bootstrap-styled buttons.
#include <QApplication>
#include <QPushButton>
#include <QHBoxLayout>

QString style = R"(
QPushButton {
    border-radius: 3px;
    padding: 10px 20px;
    font-size: 14px;
    color: #fff;
}
QPushButton[class=primary] {
    background-color: #007bff;
    border: 1px solid #007bff;
}
QPushButton[class=primary]:hover {
    background-color: #0056b3;
    border-color: #0056b3;
}
QPushButton[class=primary]:pressed {
    background-color: #004080;
    border-color: #00264d;
}
QPushButton[class=secondary] {
    background-color: #6c757d;
    border: 1px solid #6c757d;;
}
QPushButton[class=secondary]:hover {
    background-color: #5a6268;
    border-color: #545b62;
}
QPushButton[class=secondary]:pressed {
    background-color: #495057;
    border-color: #343a40;
}
)";

int main(int argc, char *argv[])
{
    QApplication app(argc, argv);
    app.setStyleSheet(style);

    auto *window = new QWidget();
    auto *layout = new QHBoxLayout();
    window->setLayout(layout);

    QMap<QString, QString> data{
        {"primary", "Primary"},
        {"secondary", "Secondary"},
    };
    for (auto [key, value]: data.asKeyValueRange()) {
        auto *button = new QPushButton(value);
        button->setProperty("class", key);
        button->setCursor(Qt::PointingHandCursor);
        layout->addWidget(button);
    }
    window->show();

    return QApplication::exec();
}
Here's how the buttons appear:


Leave a Comment
Cancel reply