FreeScout is a web-based help desk and shared mailbox. It allows businesses and organizations to manage their customer support requests from a centralized platform.
This tutorial explains how to install FreeScout inside a Docker container in the Linux. Commands have been tested on Ubuntu.
Prepare environment
Make sure you have installed Docker in your system. If you are using Ubuntu, installation instructions can be found in the post.
You also need to have a running MySQL container. Instructions can be found in the post.
Install FreeScout
Before starting, create freescout database:
docker exec -it mysql mysql -u root -p -e "CREATE DATABASE freescout"- Host network
Run the following command to create a container for FreeScout that uses host network:
docker run -d --name=freescout --restart=always --network=host \
    -v /opt/freescout/data:/data \
    -e ADMIN_EMAIL=admin@example.com \
    -e ADMIN_PASS=pwd123 \
    -e DB_USER=root \
    -e DB_PASS=pwd123 \
    -e DB_NAME=freescout \
    -e DB_HOST=127.0.0.1 \
    -e SITE_URL=http://192.168.0.12 \
    tiredofit/freescout
MySQL container should run on host network as well.
- User-defined bridge network
User-defined bridge network can be used for listening on different port. By default, FreeScout service is listening on port 80. It can be changed with -p option.
docker network create app-netdocker run -d --name=freescout --restart=always --network=app-net \
-p 8080:80 \
-v /opt/freescout/data:/data \
-e ADMIN_EMAIL=admin@example.com \
-e ADMIN_PASS=pwd123 \
-e DB_USER=root \
-e DB_PASS=pwd123 \
-e DB_NAME=freescout \
-e DB_HOST=mysql \
-e SITE_URL=http://192.168.0.12:8080 \
tiredofit/freescoutMySQL container should run on the same user-defined bridge network as well.
Notes:
- Don't forget to change
SITE_URLwhich defines site URL. - The
DB_USERandDB_PASScan be used to specify MySQL credentials. - When user-defined bridge network is used, don't forget to change
DB_HOST. It specifies MySQL container name.
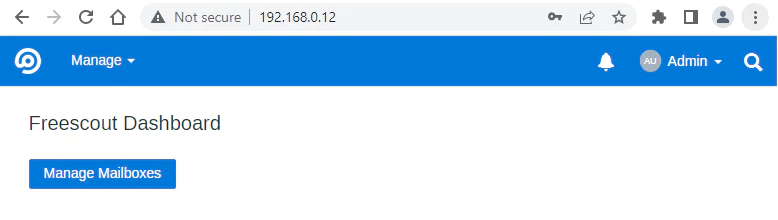
Testing FreeScout
Open a web browser and go to http://<IP_ADDRESS>, where <IP_ADDRESS> is the IP address of the system. Login to the dashboard using username and password.
Uninstall FreeScout
To completely remove FreeScout, remove its container:
docker rm --force freescoutRemove FreeScout image:
docker rmi tiredofit/freescoutYou can also remove FreeScout data:
sudo rm -rf /opt/freescoutThe freescout database can be removed as well:
docker exec -it mysql mysql -u root -p -e "DROP DATABASE freescout"If a user-defined bridge network was created, you can delete it as follows:
docker network rm app-net
The 2 Comments Found
Hi
Maybe that, if you include a section like "Uninstall FreeScout", the mysql db should be deleted too.
Regards
Hi,
You're absolutely right! When uninstalling FreeScout, it's essential to remove the MySQL database associated with the application to ensure a complete removal. To accomplish this, I've included an additional command in the post.
Leave a Comment
Cancel reply